Monday, 28 January 2008

Sharing Files

STEP 1 Find the folder you want to share


Sharing folders and hard drives is an easy task which takes no longer than 5 minutes. It is done by right hand clicking on the Folder that you want sharing and then click the share and security folder. The next step after that is to name the folder that you want to share.
STEP 2 Set the settings of the folder you want to share
Once the window has opened i can select the settings that i want, like what do i want this folder to be called on the network and so i want to allow network users to change my files if they wish to do so.

Step 3 View the shared folder

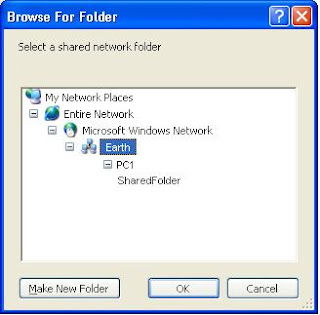
After setting the folder up that i want to share i, then needed to go to my second computer to view the files, which was done like the picture beneath. By going to 'tools' then 'map network drive', and then finding the folder.

The files are now ready to be viewied on the second computer.


Friday, 25 January 2008

Making a WorkGroup


To make the workgroup i needed to go to the control panel and then click on the icon called 'system'. From this window i was able to change the computer name, which i did to PC1 and PC2, I then changed both of the work groups to EARTH on both of the computers. The computer then needed to be restarted and i was then able to start sharring the computer files.

I was able to share the files by right hanbd clicking on the file in which i wanted to share and then i clicked on sharin


Connecting Wireless


I connected the router to the wireless router which was plug and play, which meant it was ready to use. However i needed to connect it to 'PC2', but this computer was not wireless so i installed a PCI Wireless apdator. I installed this using the cd which it came with. The computer then picked up the wireless router, which it then connected to. Once it had connected i was then enabled to connect to the internet using the wirless router which was connected to the modem which was connected to the broadband

Connecting to the internet!


I connected the broadband to a modem and then the modem to the computer. Once i had made this connection i then was able to follow the instructions to install the modem from the CD and then restarted the router and the computer. Once this was done it was connected to the internet.

Connecting a Printer

I needed to connect the computer to an epson stylus c60 printer. To do this i needed to download the driver from the epson website. After entering the type of printer to the website i then was able to download the driver, which was downloaded and then unzipped. The installation wizard then was displayed on the screen, which I then followed the simple insturctions.

Installing a DVD Drive

I have installed a DVD Drive in to the an computer. This was done by opening up the computer an then removing the case so an dvd drive can be inserted in to the computer. Because there was already an dvd drive already installed into the computer i needed to make this one a slave to the other which was the master. I did this by leaving the pin in to the dvd drive when it was installed, this is because it uses the same wire to connect to the motherboard as first dvd drive.

Wednesday, 12 December 2007

Using Useful Utilitys

The utilites are needed to look after the computer, if they are used right you can keep the computer running fast and far more cleaner than just leaving it to build up. You can download many utilitys from the interent for your computer, or you can use the ones that microsoft include in their own operating system. Which are the following:


  • Disc Cleanup
  • Disc Defrag
  • System Restore

Disk Cleanup:

This is part of the microsoft onboard utilitys, and it is designed to free up space on the hard drive. The proccess normaly takes from any where from 2-15 minutes. It envoloves doing the following tasks. It envolves scanning the hard drive for files that are no longer in use. The user also has the option of compressing files if they dont want them to be removed. This is recommended to do as it will keep the computer running fast.

Compression of old files
Temporary Internet files
Temporary Windows files
Downloaded Program files
Recycle Bin
Removal of unused applications or optional Windows components
Setup Log files
Offline files


Disk Defragment:
Windows Disk Defragmenter is another computer program which is included in Microsoft Windows. The programme was designed to increase access speed of the computer. The application rearranging files stored on a disk to occupy contiguous storage locations, or defragmenting. The purpose of defrags are to optimize the time that it takes to read and write files from the hard drive. This proccess normaly takes from anything from 10 minutes to 3 hours.


System Restore:

This is when you restore your computer to a previous pre set virsion of your computer. By default the computer will save the state of the computer ever month or when an important update happens. This is so you can return to a previous virsion if anything happens with the computer.